


Chicken Parmesan Sandwich
This is one of my all time favorite sandwiches. Use plenty of cheese, and a lot of sauce, and it is Soooo good!I'll make these for a sports, or tailgating party, or it's a great way to re-purpose leftover Chicken Parmesan. Either way, it's a hit to all who partake.
If you'd like to take these along for a tailgate party, cook the chicken, as per the instructions, including adding the sauce and cheese, then baking. You can place a pry pan on your grill, add a little sauce, cover, and cook for 7 - 10 minutes. Or, until the cheese is melted, and the chicken is hot. Just remember that you just heating it up, it's already cooked. If you cook it at too high a temperature, the chicken will dry out.
One other thing I wanted to tell you about. Yes, I made my own rolls. Last week was an adventure of roll baking. I probably made a total of 8 batches, and ended up with two great recipes. This one for the Facaccia Style Rolls, and the other was for Hamburger Buns.

- 3 Each Chicken Breasts, boneless, skinless
- 1 1/2 Cups All-purpose Flour
- 1 Tablespoon Butt Kickin' Italian Blend
- 1 Teaspoon Coarse Kosher Salt
- 2 Each Egg, Beaten
- 1 Tablespoon Milk
- 1 1/2 Cups Seasoned Bread Crumbs, Seasoned
- 1/4 Cup Parmesan Cheese
- 1 Tablespoon Butt Kickin' Italian Blend, to taste
- 1 Teaspoon Coarse Kosher Salt
- 1/2 Cup Vegetable Oil, for frying
- 1 Jar Spaghetti Sauce
- 1/2 Pound Whole Milk Mozzarella Cheese, sliced
- Facaccia Style Rolls, or Italian Bread, for 6 sandwiches
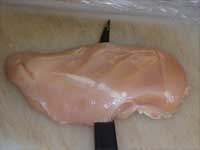
1. Begin by slicing the chicken in half to make 6 thinner pieces.

2. Lay the sliced, thinner chicken breasts on a clean platter.

3. Get 2 larger bowls ready, and one smaller one. Place the flour in a smaller bowl, along with the Italian Blend, and the Salt. Place the eggs into the smaller bowl, whisk them up, then add the milk, and whisk until smooth. Mix the Bread Crumbs, Parmesan Cheese, Italian Blend, and Salt in the other larger bowl.
Ron's Note:
The milk helps to emulsify the egg yolks. And, if you didn't use it, the egg coating would be quite thick, and you'll end up with a heavier batter on the chicken.
Ron's Note:
The milk helps to emulsify the egg yolks. And, if you didn't use it, the egg coating would be quite thick, and you'll end up with a heavier batter on the chicken.
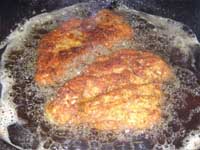
4. Place the vegetable oil into a heavy bottomed pan, like a black frying pan, to a depth of about 1/4". Heat this to a medium high temperature.
Set your oven to 350 degrees, and let it warm up while you're frying the chicken.
Dredge the chicken in flour, shake off any excess, then in the eggs, then in the bread crumb mixture. The flour help the eggs to stick to the chicken, and the eggs, give the bread crumbs something to adhere to.
Place in the fry pan, making sure that you don't crowd it. and fry until each piece of chicken is crisp and lightly browned. Be careful, because if the heat is too high, you can burn the chicken, and it'll end up dry.

5. Cook the chicken just until they're browned, and set on a parchment lined sheet pan. This can all be done up to a day ahead of time, and held in the refrigerator.
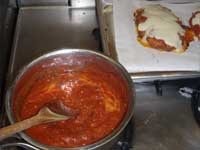
6. I had made a meat sauce a few days ago, so I thinned it down with a can of tomato sauce, as it was quite thick.

7. Coat the top of each fried chicken breast with a little sauce, then lay the sliced mozzarella on top of that.
Ron's Note:
I know it seems sacrilegious, but, for this dish, I sometimes use sauce right out of a jar with one tablespoon of my Italian Seasoning Blend added to it for some extra flavor. You really don't want a chunky sauce so don't use one that you've added onions or meat to.
Ron's Note:
I know it seems sacrilegious, but, for this dish, I sometimes use sauce right out of a jar with one tablespoon of my Italian Seasoning Blend added to it for some extra flavor. You really don't want a chunky sauce so don't use one that you've added onions or meat to.
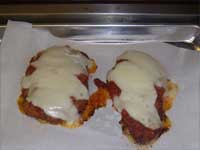
8. Cook for 20 - 25 minutes at 350 degrees. The cheese will melt, and the chicken will finish cooking, but not be dry.
9. To Serve:
Slice the bread or rolls, then ladle some sauce on top of the bottom piece. Place the chicken on top. As an option, you could now place the sandwiches under your broiler for 5 minutes, or so, to crisp the edges of the bread.
9. To Serve:
Slice the bread or rolls, then ladle some sauce on top of the bottom piece. Place the chicken on top. As an option, you could now place the sandwiches under your broiler for 5 minutes, or so, to crisp the edges of the bread.
I'd love to hear your thoughts on this recipe, or any other of my recipes you've either looked at or tried.
- Whether or not you like this recipe and why.
- How you'd like to see it different.
- Suggestions for new recipes I could post.
- Recipes you've made using Butt Kickin' Blacken.


Chicken Parmesan Sandwich
The Italian Spice Blend conatins all of your favorite Italian flavors. Plus it contains neither salt, nor sugar.
ORDER SOME TODAY!


Chicken Parmesan

Stuffed Chicken Florentine
Puttanesca

Pork Loin Sandwiches

Eye Round Sandwiches
